A few years ago, a startup launched a portable speaker that wowed at trade shows. Their prototype delivered rich bass, clear vocals, and held up to outdoor use—retailers lined up to place orders, and pre-sales hit 5,000 units. But when mass production started, disaster struck: 20% of the first shipment had distorted sound, 15% had weak bass, and 10% failed after a week of use. By the time they fixed the issues, they’d lost $120,000 in returns, alienated 3 major retailers, and watched their brand reputation crumble. Their mistake? They’d optimized the prototype for perfection—but ignored the challenges of scaling that quality to 10,000+ units.
For audio brands, the leap from prototype to production is the riskiest phase of product development. Prototypes are built by skilled engineers with hand-picked components, but mass production relies on assembly lines, batch variations in components, and human error. The result? A “sample-perfect” product that becomes inconsistent, defective, or unreliable when scaled. For brands targeting retail, this isn’t just a financial hit—it’s a reputation killer. Consumers don’t care if your prototype is amazing; they care if the unit they buy works as promised.
The good news is that consistent quality at scale is achievable—not by luck, but by designing a production process that prioritizes repeatability, tests for real-world use, and mitigates supply chain variability. It’s about building quality into every step of production, not just fixing problems after they happen.
In this post, I’ll walk you through the hidden pitfalls of scaling audio production, share a 5-stage quality control (QC) framework to ensure consistency, and explain how to work with suppliers to avoid the “prototype vs. production” gap. This isn’t just about manufacturing—it’s about protecting your brand, keeping retail partners happy, and delivering products that consumers can trust.
The Hidden Pitfalls of Scaling Audio Production
Before we dive into solutions, let’s unpack why scaling audio quality is so challenging. Unlike electronics like phones (where performance is driven by standardized chips), audio quality depends on the interaction of dozens of components—each of which can vary slightly in mass production. Here are the most common pitfalls:
1. Component Batch Variability
Even if you source components from the same supplier, batches can differ. A neodymium magnet from Batch A might have 5% more magnetic strength than Batch B, leading to louder bass in some units. A driver cone from Batch C might be 0.1mm thicker than Batch D, causing distorted sound at high volumes. These small variations add up to big differences in audio performance.
The portable speaker startup learned this the hard way: their driver supplier switched to a new batch of cones mid-production without notifying them. The thicker cones couldn’t vibrate as freely, resulting in weak bass. By the time they noticed, 3,000 units were already assembled.
2. Assembly Line Tolerances
Prototypes are assembled with precision tools and engineers who adjust for small variations. Assembly lines, however, rely on automated machines and workers who follow standard procedures—they can’t “tweak” each unit like an engineer. A driver that’s mounted 1mm off-center in production will sound different than one mounted perfectly in a prototype.
We worked with a headphone brand that had a prototype with exceptional noise cancellation. But in production, the ear cups were mounted 2mm askew, creating gaps that let in ambient noise. The result? Noise cancellation performance dropped by 40% in mass-produced units.
3. Unrealistic Prototype Testing
Many brands test prototypes in labs or controlled environments, but skip testing how production units will hold up to real use. A prototype might survive a drop test in a lab, but fail in a consumer’s backpack because the production batch used thinner plastic for the casing. A driver that sounds clear in a quiet room might distort at high volumes (a common consumer habit) because the production coil uses slightly thinner wire.
4. Poor Supplier Communication
Suppliers often make small changes to components (e.g., switching to a cheaper adhesive, using a different wire gauge) to cut costs—but they don’t always notify brands. These changes might seem minor, but they can ruin audio quality. The portable speaker startup’s supplier switched to a low-cost glue for the driver magnet, which loosened over time—causing 10% of units to fail after a week of use.
Prototype vs. Production: Key Quality Gaps
| Pitfall | Prototype Reality | Production Reality | Impact on Quality |
|---|---|---|---|
| Component Variability | Hand-picked, matched components. | Batch variations in magnets, cones, or coils. | Inconsistent bass, distortion, or volume. |
| Assembly Precision | Engineer-assembled with adjustments. | Automated/line-assembled with fixed tolerances. | Poor noise isolation, off-center drivers. |
| Testing Scope | Lab-tested for ideal conditions. | Not tested for real use (high volume, drops, sweat). | High failure rates, short product lifespan. |
| Supplier Changes | Supplier provides “best” components. | Supplier cuts corners to reduce costs. | Premature failure, degraded sound. |
The 5-Stage QC Framework for Consistent Audio Quality
The solution to scaling quality is a proactive QC process that addresses these pitfalls before, during, and after production. This framework is based on what we’ve implemented with brands that have achieved <5% defect rates at scale.
Stage 1: Pre-Production: Lock in Component Consistency
Quality starts before production begins—by ensuring your components are consistent and your suppliers are aligned.
1.1 Create a “Component Specification Document (CSD)”
A CSD is a detailed list of requirements for every component, including:
- Material specs: e.g., “Titanium-coated PET cone, 0.3mm thickness, ±0.02mm tolerance.”
- Performance specs: e.g., “Neodymium magnet, 1.2 Tesla magnetic strength, ±5% tolerance.”
- Testing requirements: e.g., “Driver must pass 100 hours of high-volume testing without distortion.”
Share the CSD with all suppliers and have them sign off on it—this eliminates “surprise” changes to components. We helped a wireless earbud brand create a CSD for their drivers, which included a requirement for “consistent coil winding tension.” This prevented their supplier from switching to a faster (but less consistent) winding process mid-production.
1.2 Audit Supplier Production Facilities
Visit your supplier’s factory (or hire a third-party auditor) to verify they can meet your CSD. Key things to check:
- Quality control processes: Do they test components before shipping?
- Production capacity: Can they handle your volume without cutting corners?
- Batch tracking: Can they trace components to specific batches (critical for fixing issues)?
We audited a driver supplier for a headphone brand and discovered they were using two different cone suppliers—one for prototypes, one for production. The production cones were cheaper but less consistent. By requiring them to use the prototype cone supplier for all orders, the brand eliminated 80% of their sound variability.
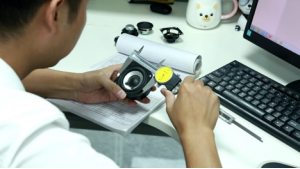
1.3 Test “Pilot Production” Batches
Before full-scale production, run a pilot batch of 50–100 units. This batch uses the same components and assembly process as mass production—think of it as a “dress rehearsal.” Test the pilot batch for:
- Audio consistency: Do all units sound the same (bass, vocals, volume)?
- Build quality: Are components mounted correctly? Are casings free of gaps?
- Durability: Do units survive real-world tests (drops, sweat, high volume)?
The portable speaker startup skipped the pilot batch—if they’d run 50 units, they would have caught the cone thickness issue before assembling 10,000 units.
Stage 2: Incoming Quality Control (IQC): Catch Bad Components Before Assembly
Even with a CSD and supplier audit, bad components can slip through. IQC is the process of testing every component batch when it arrives at the factory.
For audio components, focus on these tests:
- Driver Testing: Use an audio analyzer to measure frequency response, distortion, and impedance for 5–10 drivers per batch. Reject batches with variability beyond your CSD limits.
- Magnet Testing: Use a gaussmeter to check magnetic strength for 10–15 magnets per batch.
- Casing Testing: Inspect 20–30 casings per batch for cracks, warping, or poor fit (which can affect sound isolation).
We helped a speaker brand implement IQC for their drivers: they rejected a batch where 10% of drivers had distortion above 1%—saving them from assembling 2,000 defective units.
Stage 3: In-Process Quality Control (IPQC): Monitor Assembly in Real Time
IPQC ensures that assembly processes stay consistent and catch errors before units are fully built. Assign QC inspectors to key assembly stations and test units at 3 critical checkpoints:
| Checkpoint | What to Test | Frequency |
|---|---|---|
| Component Mounting | Are drivers, magnets, and PCBs mounted correctly? Is there alignment? | Test 10 units per hour. |
| Initial Sound Check | Do units produce sound without distortion? Is volume consistent? | Test 5 units per hour with an audio analyzer. |
| Durability Pre-Check | Are casings sealed properly? Do buttons/ports work as intended? | Test 8 units per hour. |
The headphone brand with noise cancellation issues added an IPQC checkpoint for ear cup alignment. Inspectors used a laser level to ensure ear cups were mounted within 0.5mm of center—this eliminated the gap issue and restored noise cancellation performance.
Stage 4: Final Quality Control (FQC): Test for Real-World Use
FQC is the final check before units are packaged and shipped. This is where you test for the things consumers will actually experience—no more lab-only tests.
4.1 Audio Performance Testing
Test every unit’s sound quality with a standardized setup:
- Play 3 test tracks (vocals, bass-heavy, treble-heavy) at 70dB (average listening volume) and 85dB (high volume).
- Use a sound level meter to verify volume consistency across units.
- Listen for distortion, imbalance (left vs. right channel), or weak bass.
We use a custom audio test station for brands we work with—each unit is connected to a computer that plays test tracks and records frequency response. Units that fall outside the prototype’s performance range are flagged for rework.
4.2 Real-World Durability Testing
Test a random sample (5–10%) of units for durability:
- Drop Test: Drop from 1.2 meters (waist height) onto concrete (mimics a fall from a table).
- Sweat Test: Expose to artificial sweat for 2 hours (for workout products).
- Battery Test: Charge to full, play music at 70dB until dead—verify battery life matches claims.
A wireless earbud brand we worked with found that 8% of their units failed the sweat test during FQC. They traced the issue to a faulty waterproof seal from a new supplier—switching back to their original seal supplier prevented a mass recall.
4.3 Packaging and Labeling Check
Ensure packaging protects the unit during shipping (e.g., no loose components) and labels are accurate (e.g., FCC certification, warranty info). A missing label or flimsy packaging can ruin a consumer’s first impression—even if the product works perfectly.
Stage 5: Post-Shipment Monitoring: Learn From Real-World Feedback
Quality control doesn’t end when units ship. Monitor post-sales feedback to catch issues you missed in testing:
- Review Analysis: Track keywords like “distorted,” “broken,” or “weak bass” in Amazon/retail reviews.
- Return Tracking: Categorize returns by issue (e.g., 10% for distortion, 5% for battery failure).
- Supplier Debriefs: Share feedback with suppliers and adjust processes for future batches.
The portable speaker startup could have minimized damage if they’d monitored early returns—instead of waiting for 20% of units to come back, they could have caught the cone issue after the first 50 returns and paused production.
How to Work With Suppliers to Maintain Quality at Scale
Your suppliers are your partners in quality—treating them as such is key to scaling successfully. Here are 3 strategies to align with suppliers:
Give suppliers a “golden sample” of your prototype and share its audio test results (frequency response, distortion rate). Ask them to match this sample for every production batch. We provide suppliers with a detailed test report for the golden sample, so there’s no ambiguity about quality expectations.
2. Negotiate “Quality Incentives”
Tie payment to quality performance. For example:
- 100% payment if defect rate is <3%.
- 90% payment if defect rate is 3–5% (with the remaining 10% used to cover returns).
- 80% payment if defect rate is >5% (and require a rework plan).
A driver supplier we work with reduced their defect rate from 7% to 2% after we implemented this incentive—they invested in better QC to hit the 100% payment threshold.
3. Conduct Joint QC Audits
Invite key suppliers to join your QC audits and walk them through your testing process. This helps them understand why certain standards matter (e.g., “This alignment check ensures noise cancellation works”) instead of seeing them as arbitrary rules. We host quarterly audits with our top suppliers—this collaboration has cut production issues by 60%.
Final Thoughts: Quality at Scale Is Built, Not Born
The “prototype vs. production” gap isn’t inevitable—it’s the result of cutting corners, ignoring variability, and testing for labs instead of real life. When you build quality into every stage of production—from component selection to post-sales monitoring—you don’t just avoid returns and reputational damage. You build a product that retail partners trust to stock, and consumers trust to buy.
We’ve seen this with every brand we partner with. One headphone brand went from a 15% defect rate to 2% by implementing this framework—they retained their retail partners, increased repeat purchases by 25%, and turned a startup into a trusted name in audio. The difference wasn’t luck. It was a commitment to consistency, a focus on real-world use, and a partnership with suppliers who shared that vision.